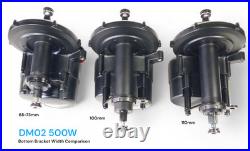

BUILD YOUR NEXT ELECTRIC BIKE! THE TOSEVEN DM02 TORQUE SENSING MID DRIVE. DM02 Ebike Mid-Drive Motor. Equipped with Torque Sensor & Cadence Sensor. Up to 500W Rated Power Output. Output Torque of 90Nm. Compatible With 36, 48, 52 Volt Battery Range. Better heat dissipation ensures cooler and longer operation, optimizing E-bike motor efficiency. Enhanced power output of 500W for dynamic e-bike performance. High speed ratio (53) provides swift starts and impressive climbs. Seamless integration with 95% of standard bike frames for easy installation of E-bike mid-drive motors. Engineered for a smooth, comfortable journey, resembling the traditional bicycle feel. Crafted from robust Aluminum alloys, ensuring durability in various environments. Trusted by top electric bicycle manufacturers for enduring performance. Upgrade Your E-bike Tod. With a ToSeven DM02 Mid-Drive Motor. Attention: To ensure optimal functioning and longevity, we highly recommend using the motor within the prescribed voltage range. 42T (or 34T/ 38T/46T/52T). See Column 6 or 7. BB=68 CL=50(or 59) Model: DM02-500 DM02-350? BB=73 CL=52.5(or 61.5) Model: DM02-500 DM02-350? BB=100 CL=66(or 75) Model: DM02L-500 DM02L-350? BB=110 CL=71(or 80) Model: DM02L-500 DM02L-350. Conditions for use and storage: 1 Regular Operation Condition? No greater than 95% Atmospheric Pressure? 86KPa–106 Ka 2 Storage Conditions? For optimal performance and longevity, store the motor in a controlled environment that meets the following conditions: Ambient temperature: 0°C to 35°C (32°F to 95°F) Relative humidity: Not exceeding 85% Clean and well-ventilated space: Free of corrosive gases 1 Installation Tool? 6mm Allen wrench 8mm Allen wrench 5-8mm Slotted screwdriver 3-5mm Phillips screwdriver Scissors 2 Crankset Mounting – Tools? Special wrench – Step 1- Align the chainring 8 with the motor 7 : Ensure the internal splines of the chainring mesh perfectly with the external splines of the motor. Step 2- Press-fit the chainring: Firmly press the chainring onto the motor axle until it reaches its seated position. Step 3- Tighten the lock nut 9 : Using a special wrench, tighten the lock nut in a counterclockwise direction to a torque of 15 Nm. Diagram: 3 Motor Mounting. Place the motor on the right side of the bicycle frame, aligning it with the bottom bracket opening. Carefully guide the motor into the bottom bracket until it reaches its fully seated position. Reinforcement Plate Mounting – Tools? 6mm Allen Wrench – Components? Washer or bushing 6? Screw tightening torque 9-10Nm -Diagram? – BB=68 – BB=73 washer specification? 6X5 – BB=100 Bushing specification? 6X32 – BB=110 Bushing specification? Non-standard nuts installation -Tools? Non-standard nut 3 -Requirement? Before tightening the nut, turn the motor clockwise until the motor is close to the lower tube of the frame and does not turn until it stops, then use a special wrench to tighten the nut, torque is 45-50Nm when tightening -Diagram? 8mm Allen wrench -Components? Right crank 10 – Requirement: central axle screw locking torque is 35-40Nm -Diagram? Speed Sensor Mounting: (MODEL:SVS1 and SVS2)? Required Tools: – Slotted screwdriver (5-8mm) – Phillips screwdriver (3-5mm) – 4mm Allen wrench – Scissors? Sensor Mounting: – Secure the sensor to the bicycle fork using two cable ties. Ensure the sensor is positioned comfortably within the designated area. Magnet Installation: – Using a slotted screwdriver, attach the magnets to the spokes of your wheel. Alignment is crucial: During installation, ensure the flat surface of the magnet where the magnetic field is strongest aligns directly with the circular mark on the sensor. Sensor Calibration Model: SVS1. Locate the screws on the sensor using a Phillips screwdriver. Loosen these screws slightly. While holding the sensor in place, carefully move it to achieve a distance of 2-5mm between the circular mark on the sensor and the flat surface of the magnet (often where the magnetic field is strongest). Once the optimal distance is achieved, tighten the screws securely using the Phillips screwdriver. This sensor model does not allow for distance adjustment between the sensor and the magnet. Proper functionality can still be achieved as long as the distance between them remains within 15mm. 1-Sensor 2-Tie 3-Magnet 4-Screw 5-Receiver. 1- Speed sensor 2-Cable tie 3-Magnet 4-ScrewM5X8 5-Receiver 6-Plastic cap. Basic Required Components: – Display? Carefully plug the EB-Bus cable, battery, and speed sensor connectors to their corresponding connectors on the motor. The other ends of the EB-Bus cable connectors can be plugged into the display, brake lever or brake sensor, throttle, etc. To ensure optimal performance and longevity of the cables, we kindly recommend avoiding routing all cables through the narrow space between the motor and the frame. This will help prevent the cables from being pinched or damaged. Due to different communication protocols, our motors can only be used with the accompanying accessories we provide and are not compatible with accessories from other brands. Using unauthorized accessories can cause damage to our motors and displays, and we will be unable to provide any after-sales support.